
Pasatiempo Golf Club
The Spanish word “pasatiempo” is translated as “hobby” or “pastime” or a “relaxed passage of time.” Over the years, golfers have argued that there are few places more breathtaking and challenging than the course named Pasatiempo, built by Marion Hollins and legendary architect Dr. Alister MacKenzie.
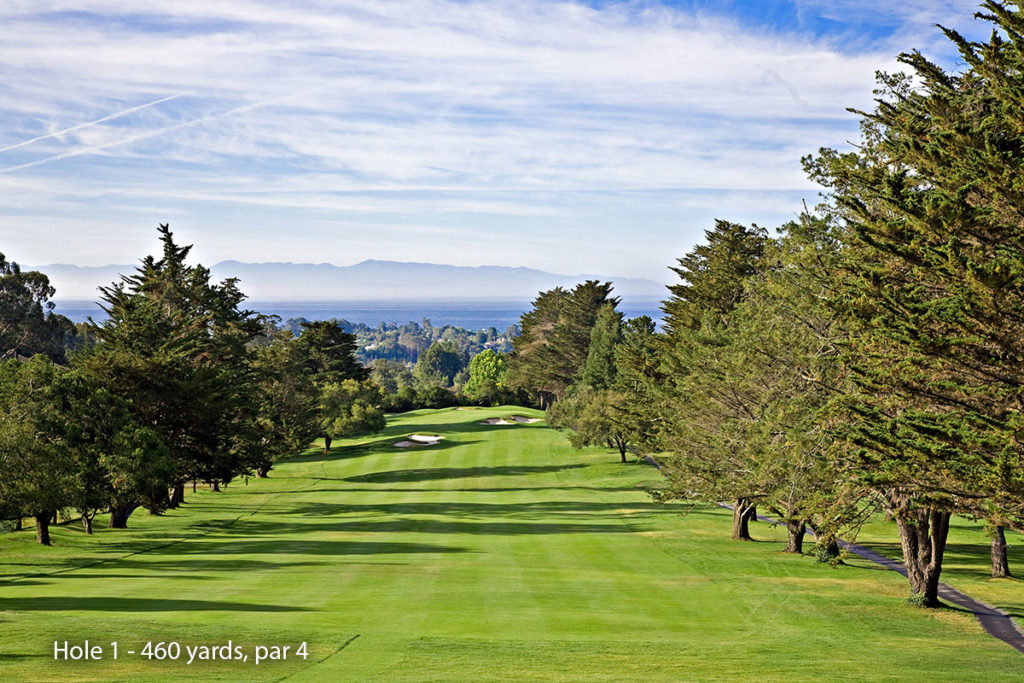
Hole 1 (460 yards, Par 4)
Opening quite serenely, the downhill, straightaway hole is a challenge for any player. Off the tee, play a driver or a three-wood, depending upon which club is straighter. Even with a solid drive you are left with a challenging second shot — low handicappers and big hitters may choose to try to get home in two, but most mortals will lay up, leaving a delicate pitch shot to a green fronted by three large bunkers. The green has two tiers with the pin usually cut to the back. Definitely a tough way to start.
— Ken Woods, Head Pro
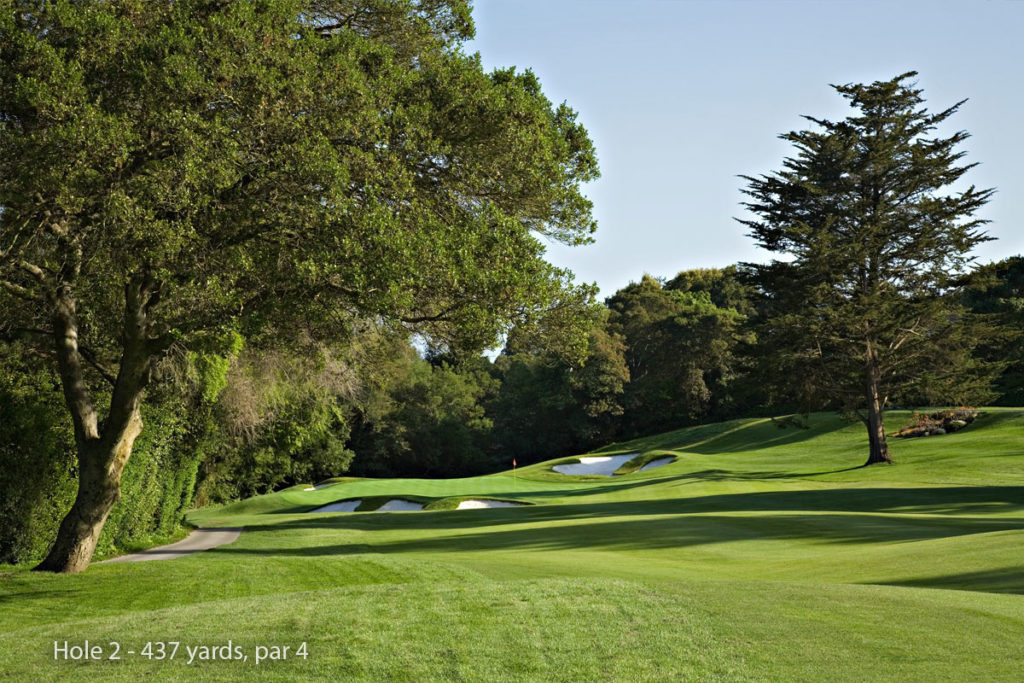
Hole 2 (437 yards, Par 4)
From the tee of this difficult par 4 it is easy to be lulled into a false sense of security. While it is a generous driving hole with plenty of room all around, the fairway does narrow closer to the green. Drive the ball to the right off the tee as the fairway slopes right to left down toward some menacing rough and a recently-restored fairway bunker. The narrow opening to the green will definitely grab full attention on the second shot which calls for a mid to long iron and must be precise to keep away from trouble from substantial traps on both sides of the green. If possible, land to the right side of the green to counteract, if not take advantage of, the hard right to left cant.
— Ken Woods, Head Pro

Hole 3 (217 yards, Par 3)
One of the toughest par 3's anywhere. The third hole requires a solid two-iron or five-wood off the tee. Shorter hitters should play left of the recently restored bunker in the middle of the fairway. Miss the green to the right and it will be the fortunate golfer who walks away with a bogey. A deep bunker to the right swallows errant balls and a large Cypress tree guards the putting surface which is one of the most treacherous on the course, sloping severely back to front. So make sure to stay below the hole — a piece of advice that holds true to a greater or lesser extent to virtually every green on the course.
— Ken Woods, Head Pro
Hole 4 (378 yards, Par 4)
A relatively short par 4 where par should be the norm and any birdies collected merit a pat on the back. A well positioned tee shot is a must, so it's probably best to hit a three wood, taking aim at the left flank as the right holds two fairway bunkers. The approach shot is a four or five-iron to a long, narrow green surrounded by bunkers. Disaster awaits the player missing his second shot right of the green where plenty of trouble shot opportunities are created by two bunkers and a steep drop off. The drop off actually begins on the green itself with the back right quadrant feeding down to a bowl.
— Ken Woods, Head Pro
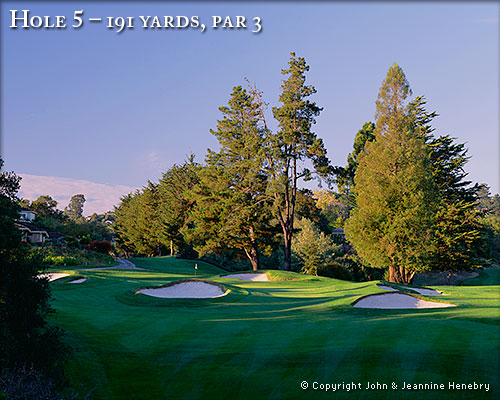
Hole 5 (191 yards, Par 3)
A medium to long, uphill par 3 that requires a carry of 190 yards to make it safely to the green. Select enough club to fly the ball to the green in order to escape the gaping bunker in front that gobbles up tentative, short shots. Be very careful with club selection because it's an almost sure bogey if the shot is long, thereby necessitating a chip back onto a green falling away toward the front. Stay below the hole and to the right.
— Ken Woods, Head Pro
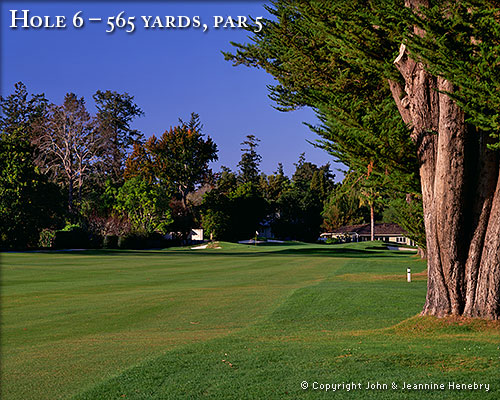
Hole 6 (565 yards, Par 5)
Hit it far but keep it straight down the outstretched and narrow tree-lined corridor. A driver must find the middle of the fairway since out-of-bounds runs down the entire length of the left side of the hole and comes into play on the right for your drive. Finding the fairway with the drive, be smart and lay up with an iron that can be controlled to take out-of-bounds (on the left) out of play. Playing the hole aggressively carries no small risk. At the 150 yard marker turn left and wave to Alister MacKenzie’s ghost; the MacKenzie home is approximately 100 yards from the green. By the way, an extra club length should be added when the pin is cut at the rear of this long green.
— Ken Woods, Head Pro
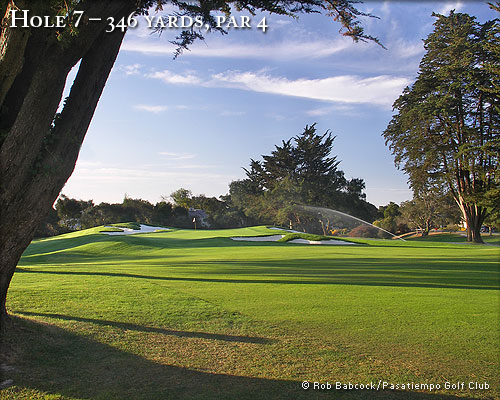
Hole 7 (346 yards, Par 4)
The narrowest hole on the golf course, it is a par 4 that forces most golfers to reach for their “straight” club off the tee. A more generous landing area in the fairway awaits the courageous player who uses a driver. Either way, stay to the left of center of the fairway, which falls down to the right with a large fairway bunker reachable by longer hitters. The approach shot with a mid to long iron must be on target and come in high to avoid the four greenside bunkers protecting the green.
— Ken Woods, Head Pro
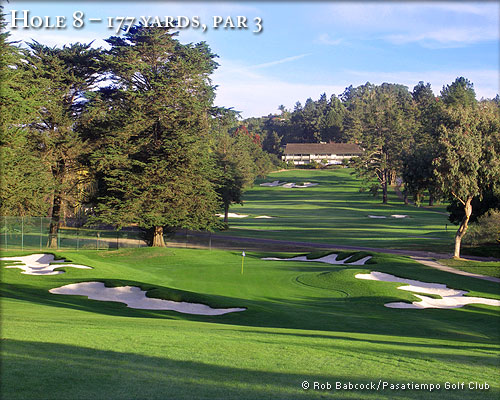
Hole 8 (177 yards, Par 3)
Not as demanding as the first two par 3's on the front side, the eighth hole requires a solid iron shot — usually a four or five-iron — to a severely sloped green where three-putts are a way of life. The putting green, very wide and canted back to front, is one of the most difficult on the course and demands a delicate touch, especially of the player having to putt downhill. Landing below the hole is imperative.
— Ken Woods, Head Pro
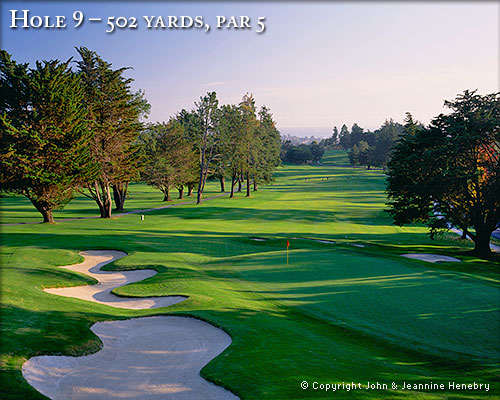
Hole 9 (502 yards, Par 5)
The par-5 ninth is a chance to score a birdie if played smartly rather than greedily. Although aggression is sometimes rewarded, a well-placed drive kept right of the two fairway bunkers 224 yards out on the left flank, and a controlled second shot—a long iron—that steers clear of the thicket of trees lurking along the right will set up an easy pitch to the green. Beware of the out-of-bounds marker on the left side of the green and avoid the bunkers in front of the green. You are half way through the round and many interesting shots are yet to be played.
— Ken Woods, Head Pro
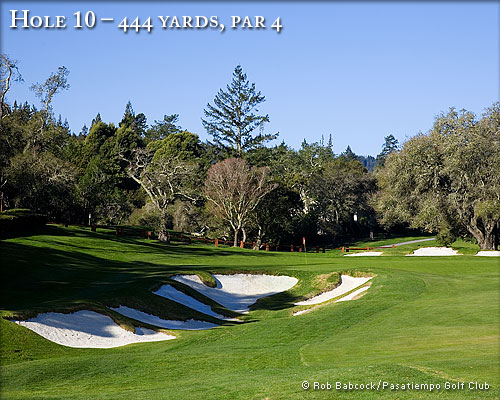
Hole 10 (444 yards, Par 4)
A dog-leg par 4, the 10th hole features a series of intimidating but conquerable ravines. The drive must carry approximately 189 yards to clear the first barranca, leaving a second shot that should be played using a three-wood or two-iron. The second shot is downhill to a sloping fairway and must be accurate—right, left and short all add up to extra strokes. A new trap complex has been recently added to the left side of the fairway in front of the green as part of the MacKenzie restoration project.
— Ken Woods, Head Pro
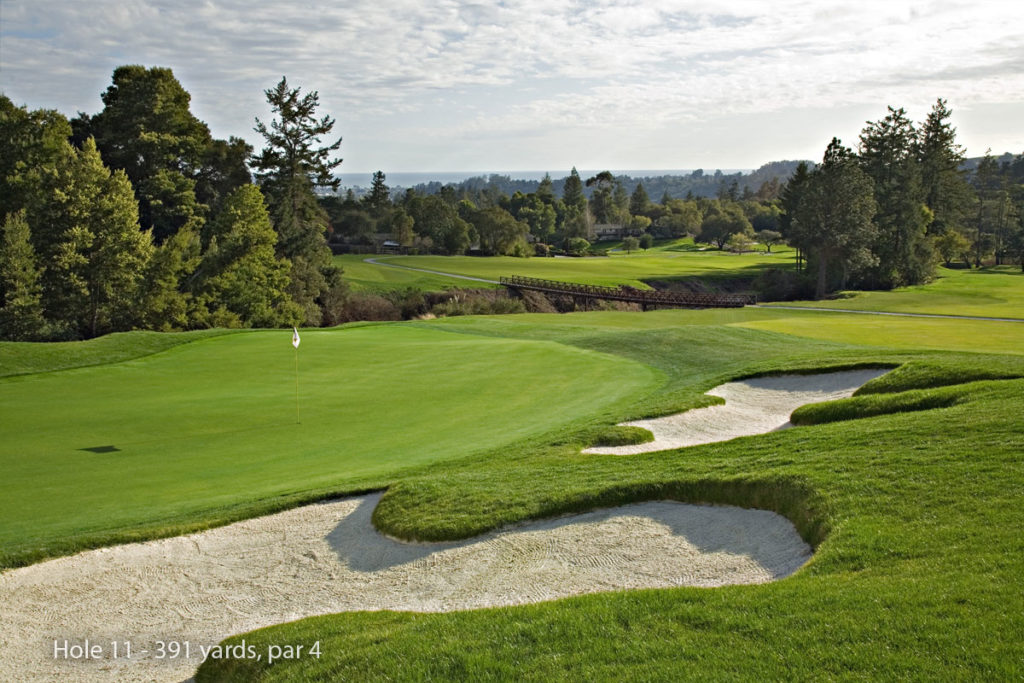
Hole 11 (391 yards, Par 4)
Don't be fooled by the distance of the hole. The 11th is a difficult, entirely uphill par 4 that has acted as the spoiler to many a good round. A long and straight drive that finds the fairway is a must. Be careful not to hook. The second shot is a long iron over a deep barranca that opens at the very front edge of the green. A useful rule of thumb is to take an extra club length on the approach, but stay below the hole, avoid downhill putts at all cost. The putting green is one of the toughest on the course, so even when on in regulation, don't relax.
— Ken Woods, Head Pro
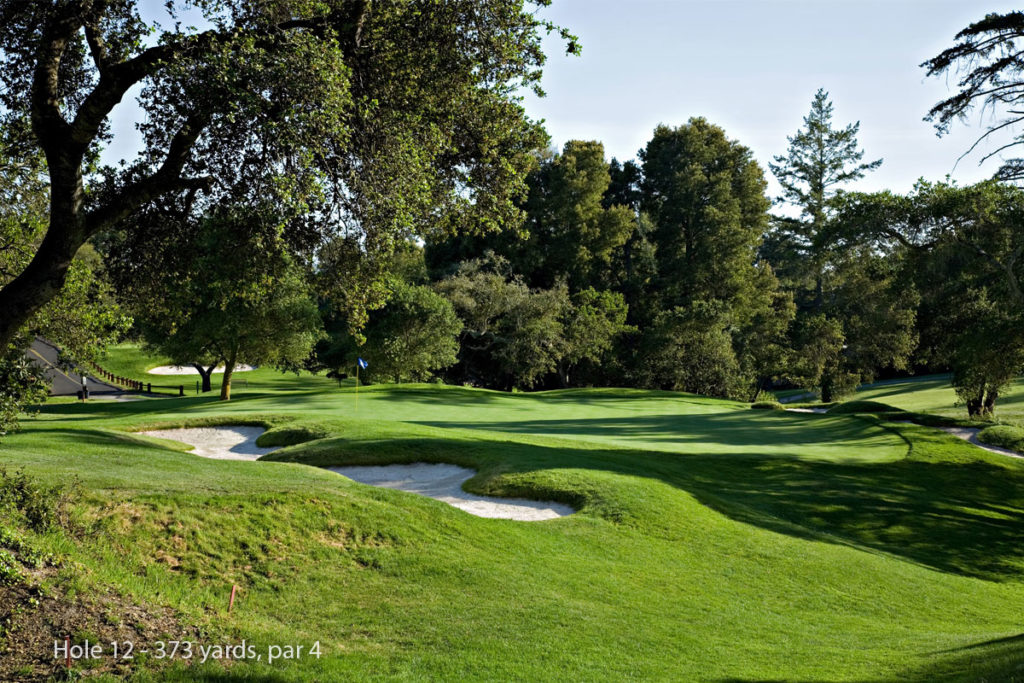
Hole 12 (373 yards, Par 4)
It is easy to become swept up in the panoramic view of the bay driving off the highly elevated tee, but maintain concentration. Play the drive down the right side of the wide fairway and let the ball run down the slope. Land too far left and risk getting blocked on the second shot. Closer to the green, the fairway narrows to a skimpy tunnel of trees dotted with depressions that toy with errant shots. The approach shot must be played directly onto the green, as trouble awaits in front in the forms of a shallow valley and fronting bunkers. The green is relatively flat but sneaky tough.
— Ken Woods, Head Pro
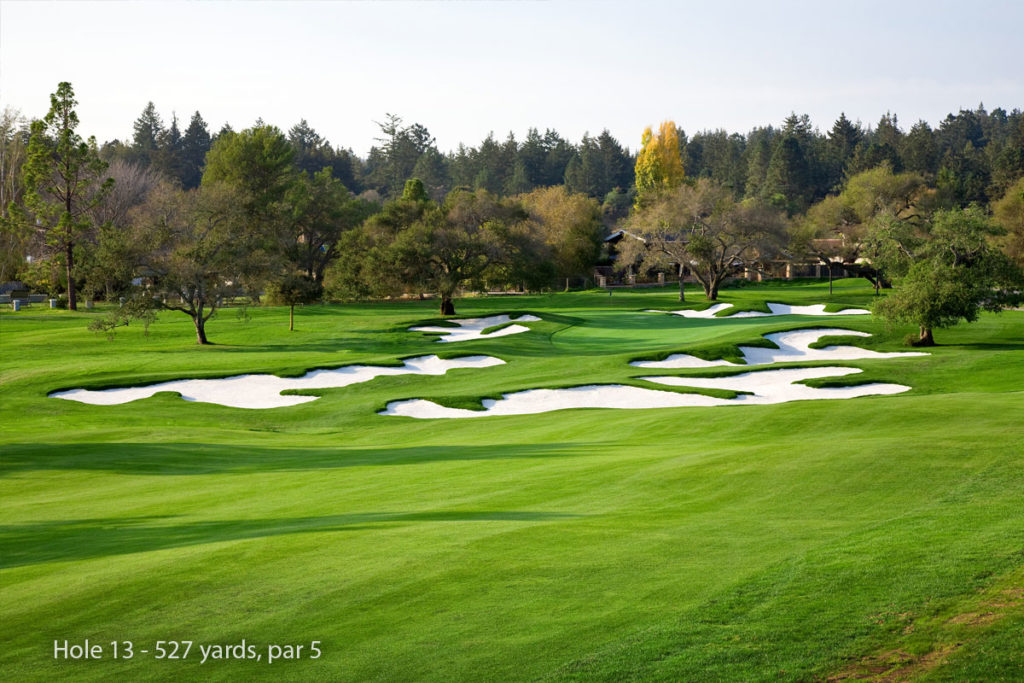
Hole 13 (527 yards, Par 5)
The final par 5 on the course, the 13th is also the widest and the easiest. If there is one opportunity where aggressiveness carries the greatest reward to risk, now is the time for big hitters to go for the green in two. Definitely play the driver off the tee to make the most of the extra fairway. The second shot is either a three-wood or solid long iron that must find the center of the fairway to leave a short approach to the green. Don’t run the approach shot onto the green because the surrounding bunkers will snare the ball. Instead, come in high with a short iron to a “mickey mouse” shaped green.
— Ken Woods, Head Pro

Hole 14 (426 yards, Par 4)
A simple looking tee shot — until it disappears down into an irregular grassy swale that wanders down the left side of the fairway. Land here and the green may not be visible, so keep right. An uneven lie may await the second shot — usually a mid-iron — that must get airborne to carry huge oaks extending into the fairway from the right side. Go for the left of the green not only to avoid the trees but also the large, menacing trap hugging the right of the open, flat putting surface.
— Ken Woods, Head Pro
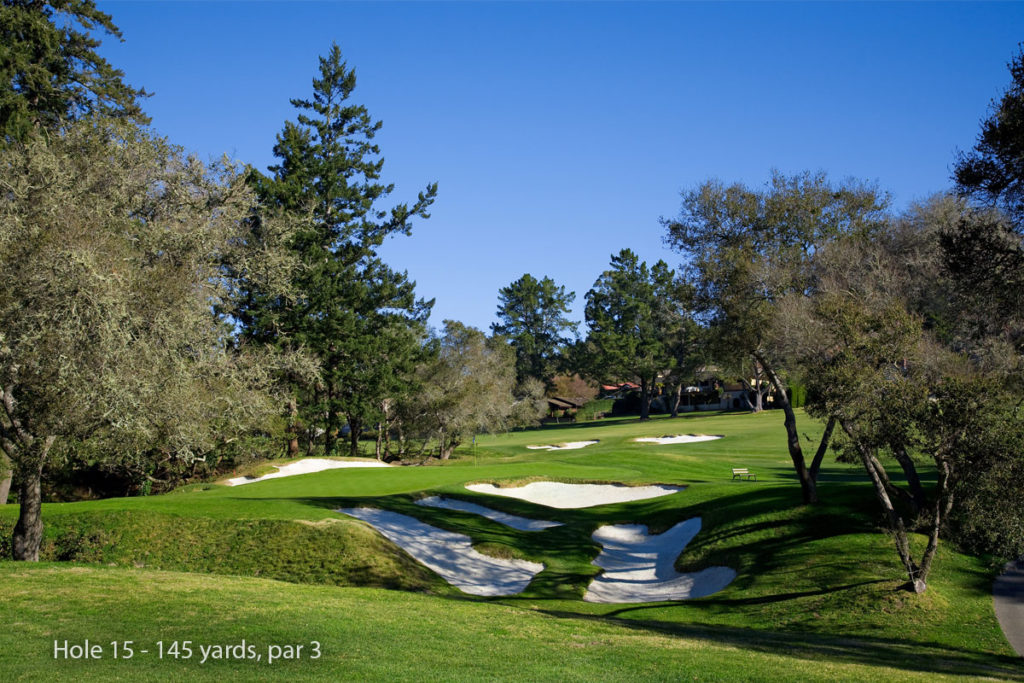
Hole 15 (145 yards, Par 3)
A seductive little par 3 that has more hazards than one realizes when standing on the tee. When the pin is placed on the right side, be careful to avoid the pesky oak tree that has been known to reach out and bat balls down into a water hazard. From there, a bogey four is a great success. The smartest and safest route is playing a six or seven-iron, always coming into the hole from the left. Be sure to take enough club, because a ball landing short can spin off the green into the rough.
— Ken Woods, Head Pro
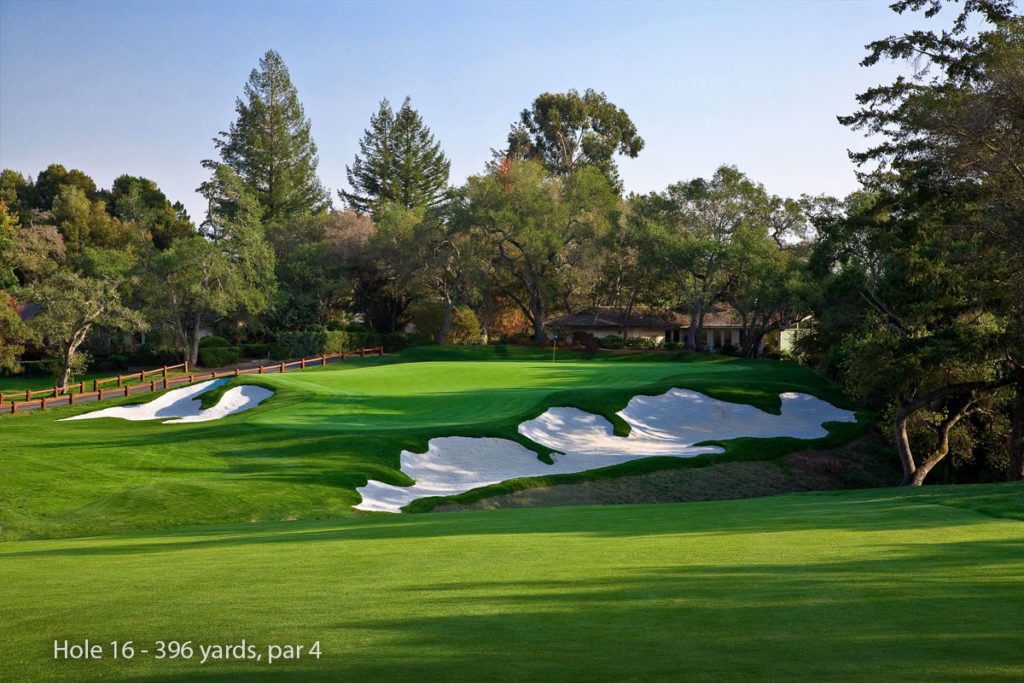
Hole 16 (396 yards, Par 4)
MacKenzie's favorite par 4, the 16th at Pasatiempo strikes fear into the hearts of nearly all who play it. A blind tee shot calls for some intelligent planning, precise placement with a draw. Too far left, the ball ends up in a barranca, and too far right is OB. Even the best drive leaves a long, downhill second shot to a three-tiered elevated green, guarded by an array of green side bunkers. Be on target or risk severe penalties; the green rests behind a deep barranca and stream below.
— Ken Woods, Head Pro
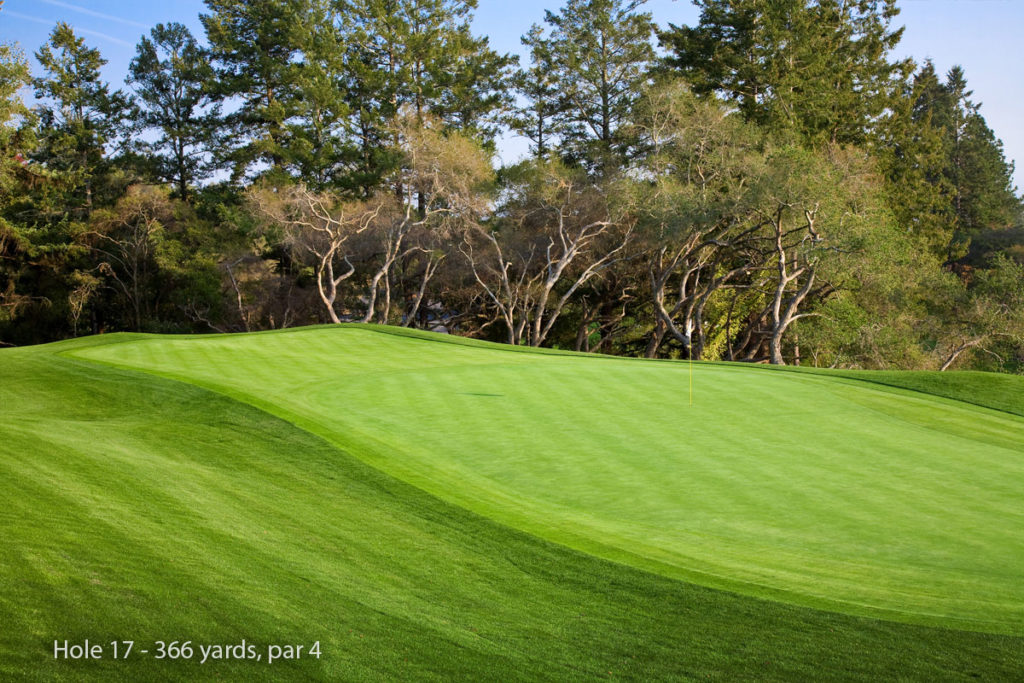
Hole 17 (366 yards, Par 4)
A relatively short par 4 with a wide fairway and a large green. Leave the driver in the bag and hit either a three-wood or two-iron to make sure the tee shot finds the tree-lined fairway. Unless you’re a short hitter, the approach shot is no more than a five or six-iron, but take enough club as the shot is all uphill. Be cautious of the hazard which now comes into play on a back hold location.
— Ken Woods, Head Pro
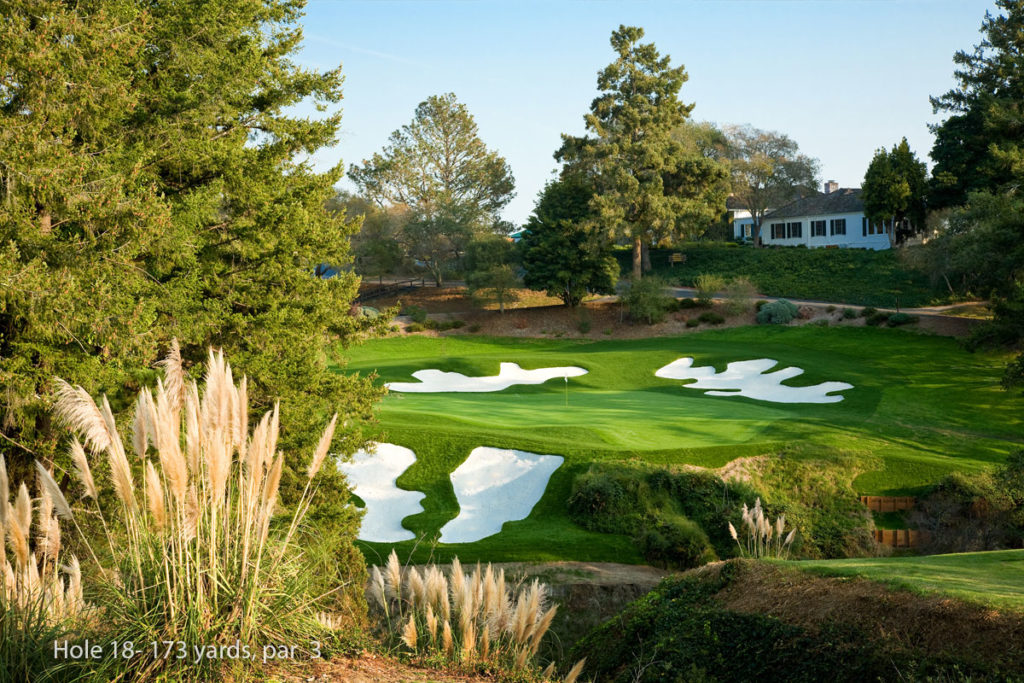
Hole 18 (173 yards, Par 3)
The finishing hole requires a 170-yard carry over a huge barranca that is wreathed by trees and fronted by two recently-restored greenside bunkers. Usually a four or five-iron, an extra club length may be called for on this downhill tee shot, depending on headlong breezes that are not detectable from ground level. Look at the tree tops for guidance. Towering trees on the right negate many shots, while shots left short of the hole spin back toward the deep canyon guarding the green — one of Pasatiempo’s trickiest. This is not the hole to falter on... Play it bravely.
— Ken Woods, Head Pro
Range
The driving range is located near the first green and is available for use by members and guests. Shuttle service is available from the first tee to the driving range.
Practice Facility
A professional practice facility — with large putting and chipping greens and multiple traps — is located next to the first tee. This facility will help you ready your putting, sand play, and chipping game.
Additional information
- Pasatiempo Golf Club
- Dr. Alister MacKenzie, course designer
- History of Pasatiempo